Part 2 of the bw walkabout. Some more verticals will follow.
The wide digital vista.Panoramic news,books,images,experiments,reviews and adventures from long views to equirectangular 360x180. Highres Panoramas, immersive virtual tours and more.
Montag, 15. Dezember 2008
Mittwoch, 10. Dezember 2008
Lunapark at night
At the last night in Sydney we did one more outing to a rather touristic spot, Luna Park (Wikipedia link) at Milsons Point nearby the Harbor Bridge (Wikipedia link). I let the Mamyia ZD run versus the LX3 and challenged them with this blue hour/night condition. Here the results of the Panasonic Lumix LX3. Quite convincing results, little noise for this small camera at night, specifically the dynamic bw mode, which I hardly touched in PS. ZD results will follow.
Montag, 1. Dezember 2008
Sydney 16:9 Walkabout
Dienstag, 25. November 2008
Panoramic backlog
I do regular harddisk housekeeping and backing up my files, both raw and processed, and always during these exercise I come across unprocessed or "unseen" images. So while copying some more images to the safe (?) DVD I stumble upon the handheld LX panos from September made in Neustadt (Germany). Yes, handheld panoramas are possible, even with wide angle lenses (in this case 24mm), it takes some practive and might not be perfect though. The buildings in the old town of Neustadt are not perfectly straight either, but the manual shooting increased slightly the obliqueness.
Just realized, this blog turns 100 ! Nice occasion and dedicated to my home place ! I am happy to be persistent enough to write more or less regularly and enlight readers with my panoramic endeavors and experiments.
Montag, 17. November 2008
16:9 Walkabout
Occasionally it is my pleasure to go around with a simple (or rather small) camera and enjoy lightweight and tourist-alike snapping away. The Panasonic is a perfect companion if you want to leave your DSLR stuff at home. And the dynamic bw mode with some curve adjustment is just nice to enjoy simple digital photography from time to time.
Donnerstag, 6. November 2008
GIGAPAN Chinese Garden
Another GIGAPAN made with the modified gigapan systems head and the Panasonic Lumix FZ28. 96 images stitched with PTGui to a 14.200 x 17.300 pixel image (245MP). Not sure if it reveals much more details than 4 Canon 1Ds images stitched together. Maybe I will compare for this sake.
See the complete GIGAPAN here (link)
Panorama Tripod a shoestring II
To follow up on the description of the simple mini panorama tripod, here some results:
LX3 @24mm (ISO80), F5, 1/250s (Shot in 16:9 format by mistake), 30 degree between the 7 images covering roughly 180 degree.
Resulting in a 10.300 x 3.600 pixel image. (below smaller jpg version)
LX3 @60mm (ISO80), F5, 1/250s (Shot in 16:9 format by mistake), 20 degree between the 17 images covering roughly 180 degree.
Resulting in a 19.000 x 3.800 pixel image. (below smaller jpg version and 100% crop)
Conclusion:
I am happy with the results for a 270g (tripod only, LX3 comes at another 275g) light tripod that fits into my daily bag.
It needs some finetuning for the nodal point for closer subjects, I used the pre-made holes in the L-shape bracket. All you need is a drilling machine.
LX3 @24mm (ISO80), F5, 1/250s (Shot in 16:9 format by mistake), 30 degree between the 7 images covering roughly 180 degree.
Resulting in a 10.300 x 3.600 pixel image. (below smaller jpg version)
LX3 @60mm (ISO80), F5, 1/250s (Shot in 16:9 format by mistake), 20 degree between the 17 images covering roughly 180 degree.
Resulting in a 19.000 x 3.800 pixel image. (below smaller jpg version and 100% crop)
Conclusion:
I am happy with the results for a 270g (tripod only, LX3 comes at another 275g) light tripod that fits into my daily bag.
It needs some finetuning for the nodal point for closer subjects, I used the pre-made holes in the L-shape bracket. All you need is a drilling machine.
Samstag, 1. November 2008
Panorama Tripod a shoestring
Occasionally I bring only a small camera along on shirt trips. The Panasonic LX3 or FZ28 deliver pretty good quality RAW images without carrying my 1Ds or ZD. Sometimes I create handheld panoramas and wish I had a tripod with a panoramahead at hand. I tried to create the lightest and smallest pano-tripod with parts I have in my repository.
Lets take table tripod (0$, came for free with another small camera), a L-shape bracket from the DIY-shop, 2 tripod screws and a Novoflex Panohead (for about 100$) from Ebay.
Yes, it is not perfect, it is not perfectly mounted over the nodal point, but with the FZ28 starting at 28mm it is pretty OK. Will upload some result files later.
The whole set can be disassembled and fits into my notebook bag and comes along any short business trips. And I even can do night panoramas now.
Freitag, 17. Oktober 2008
Panasonic LX3 Review
I am not very good in reviewing cameras in a professional and technical exact fashion. I know how to choose a good camera with the features I need and usually check a couple of online reviews before deciding to buy. There are myriad of testsites, but let me tell you 95% of them are crap, they just try to get you on the site with links to online shops selling the camera, sometimes you find the same text on several of these "test portals"..rubbish. Two I regularly visit is dpreview.com (link) and luminous-landscape.com (link), the latter one is pretty independent, has less reviews, but feels more serious than the standard review approach in dpreview, anyway judege by yourself.
I want the highlight the Panasonic LX3 review (link) which confirms that this is a real great camera and belong into the pocket of any photographer who wants to do crips shots out there while not carrying around a DSLR ! I wonder whats the big deal about the Leica D-Lux 4, which is the exact same camera whith a red dot and a 200S$ difference in price.
Mittwoch, 15. Oktober 2008
Sonntag, 12. Oktober 2008
GIGAPAN Tips and Tricks (Part 2)
This topic does not apply specifically to images created with the Gigapan system, but to all stitching practice in general. The gigapan gives you more control over the process than for example handheld shot panoramas or using a panohead without dents.
I am a perfectionist when it comes to stitching images. I dislike (creating or printing) panoramas where you can see obvious seams or moving subjects that show up half (usually referred to as ghosts).Preconditions:
a) All images are shot with same camera settings (whitebalance, aperture, speed). Optional usage of RAW.
b) The more overlap the better (to some extend only!). I recommend somewhere 30..45%. This you set during the Gigapan Setup (FOV setting) or manually while shooting with non-gigapan gear.
c) The more images (or the higher the cameras resolution) you want to stitch the longer it will take, resp. require more memory in order to get results in a realistic timeframe. I am not sure what are the limitations of running Gigapan Stitcher under Windows 32.
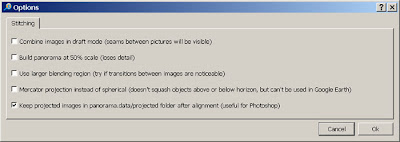
d) Set the "Kepp projected images" option in the Gigapan Stitcher Options screen (see Img.1)
Img.1
Tips for Photoshop:
(Big panoramas require lots of memory for a decent working speed.)
- Use Windows 64 with lot of real memory (not always an option due to availability)
- Terminate any other non-essential programs or services.
- Switch off the copy to clipboard function (see PS options/settings).
- Assign 75..80% of memory to PS (see PS options/settings).
- Reduce the PS history to 2 or max 3, worst case to 1 (see PS options/settings).
- Do a regular EDIT/PURGE/ALL to relief memory (seems to work for me).
- Be patient.
Retouch/Post Processing:
With plenty of overlap I created the 2 images (detail crop img.2) of the same spot with the scene itself changing. The stitcher cannot take care of moving subjects like people or cars. You can se the result in img. 3 (upper part). To remove the ghost appearance you load the warped images with the overlapping scenes from the data/projected folder (applies only to gigapan stitcher) into Photoshop. If you use PTGui save the resulting panorama file either as image with all layers or save the layers as separate files. Now you copy and paste parts of the scene to repair from the warped images into the stitched "big" file (use 50% transparency to match the non-moving subjects like flagpole, etc.) and use the layer tools to reveal or hide the parts to repair. I find this as a very efficient and fast way to repair the ghosts and its way better than cloning and stamping subjects, background patterns or copy-n-paste-mirror-resize bodyparts. See he result in img.3 or goto gigapan.org (link) to see the fullsize version.
Tips for Photoshop:
(Big panoramas require lots of memory for a decent working speed.)
- Use Windows 64 with lot of real memory (not always an option due to availability)
- Terminate any other non-essential programs or services.
- Switch off the copy to clipboard function (see PS options/settings).
- Assign 75..80% of memory to PS (see PS options/settings).
- Reduce the PS history to 2 or max 3, worst case to 1 (see PS options/settings).
- Do a regular EDIT/PURGE/ALL to relief memory (seems to work for me).
- Be patient.
Freitag, 10. Oktober 2008
handheld panorama
monochrome Digital
Professional DSLR dont have a monochrome (or any other special effect) mode. If you convert you really want to do that in PS with the maximum of control and flexibility. The monochrome mode you find in consumer camera is pure crap and you use it one time only (after buying the camera and playing with all menus!).
But the LX3 is the first camera that changed my opeinion about this. The (dynamic) bw mode is really coming close to "real" bw and its fun to use it. The below samples are all shot in ISO100, 16:9, JPG fine and dynamic bw mode.
Donnerstag, 9. Oktober 2008
Hacking your camera: Remote Trigger
I am still working on my panorama-rig with 10 cameras. To be frank, all the equipment is still sitting in the drawer collecting box with 1 opened camera and a soldering iron beside it.
Anyway, I found some "free" info on creating a remote trigger:
Wiley is publishing a book "Hacking Digital Cameras" (link). Check out the free pdf prevew chapter, it contains exactly what we are looking for !
Anyway, I found some "free" info on creating a remote trigger:
Wiley is publishing a book "Hacking Digital Cameras" (link). Check out the free pdf prevew chapter, it contains exactly what we are looking for !
Canon Camera Hack
I came across some websites with in-detail information about hacking Canon cameras. Not all, but some models allow changing the firmware in a temporary fashion, means it is non-destructive and reversible. Some pretty cool new functions you get out of an el-cheapo consumer cam. RAW, timelapse, scripting, to name a few.
Unfortunately I dont have one of the supported cameras and I fear if I buy one, it wont support because of a different firmware version.
Why is it interesting for us ? Because we can turn a camera with full-auto only into a manual camera ! (please note I am not 100% sure about this)
Unfortunately I dont have one of the supported cameras and I fear if I buy one, it wont support because of a different firmware version.
Why is it interesting for us ? Because we can turn a camera with full-auto only into a manual camera ! (please note I am not 100% sure about this)
Links:
Lifehacker.com (link)
CHDK Wiki (link)
Closing Remark: This "hacking" function seems to be a support function backdoor that found its way into public. X-Files: Maybe it was leaked intentionally to make the camera more hip to the tech geeks ?
Mittwoch, 8. Oktober 2008
New Stitching application
During the last few years a couple of image stitching applications appeared on the scene and most of them matured well, means upgrades with faster performance, more functionality, better results and so on. Just to name a few (at leats these ones I ever used):
Panorama Factory (link)
Autopano Pro (link)
PTGui (link)
Hugin (link)
Today I prefer to work with PTGui with a truckload of manual functionality, as well superb results in auto-mode.
Btw, the Gigapan system is "shipped" with a stitcher as well. (link)
Microsoft Research just launched another new stitcher (ICE, Image Composite Editor) in the neighborhood of Deepzoom Composer and co. I just gave it a try and the results are pretty good. I will continue to test.
Some more info (link)
Download (link)
Donnerstag, 2. Oktober 2008
GIGAPAN Tips and Tricks (Part 1)
- Check if the camera fits into the GIGAPAN camera bracket, the Panasonic LX3 almost doesnt fit. Check the list of tested cameras here (link)
- Use a camera that allows manual override, at least with a exposure lock, otherwise dont waste your time. Results are disappointing (due to the camera producing different exposed pictures, not the fault of the gigapan system).
- You might want to look out for a camera that supports RAW to get some extra control on color, exposure and detail(?).
- Best result with these camera settings: manual exposure, manual or fix whitebalance (aka sun, cloud,..), fix focus.
- Dont use digital zoom ! It is not going to increase the resolution ! Switch it off.
- The more overlap you have between the images, the higher the chance you can patchwork (in PS or GIMP) some of the moving and most probably half objects.
Donnerstag, 25. September 2008
First GIGAPAN
Finally I get my hands dirty with the GIGAPAN head. I brought it from Singapore (after it was shipped from US) back to Germany to spend some time experimenting with it. I share some first hands-on experience with it. Ultimately I will compare the GIGAPAN setup with stitched images from 1Ds and Mamyia ZD and a spherical scanner (even complete different league of equipment!). I will look into usability in the field.
Technical Data:
- Camera New Panasonic LX3 (10 MP, jpeg high). Manual settings, fix white balance. Manual focus.
- 25 images in 3 rows and 5 columns
- Setup and shooting in less than 5min. Finding a spot 30min.
- Stitched with Gigapan Stitcher 12.619 x 4.687 pixel (59.1MP) in roughly 10min.
- Photoshop to crop and slight curve adjustments.
Conclusion:
- The setup of the head is fast. The one-time (per camera) setup you better do at home and get comfortable with the settings of both camera and GIGAPAN
head.
- The total shooting time depends on the camera, (How fast can it store the image data ? Does it run out of buffer after 10 or so shots ?), the size of FOV and the area you want to cover. The more you can zoom in (with the lens), the smaller the FOV the more pictures you have to take.
You should experiment with the settings, especially with the break in seconds between the shots before you go out and start shooting.
I tried with the (slower) BenQ camera and the GIGAPAN head was triggering faster than the camera can digest, ending up single shots got lost.
Options:
- Shooting in RAW, would give a bit more control later on color temperature, maybe a slightly (?) higher level of detail. But most cameras cannot shoot continously in RAW without the need to clear the buffer to the memory after a number of shots (the same time you cant do anything but wait). Note there is no "data" connection between head and camera. The head does nothing but moving the camera and triggering mechanically.
- Stitch with PTGUI to achieve more flexibility, eg. stitch to PSD format with individual layers, provided you have enough memory and CPU power.
I will upload the result in original size to gigapan.org once I am back to my office with fast broadband connection. So this is a downsized preview only.
I will add more test results and feedback as I proceed testing. Stay tuned.
Abonnieren
Posts (Atom)