This topic does not apply specifically to images created with the Gigapan system, but to all stitching practice in general. The gigapan gives you more control over the process than for example handheld shot panoramas or using a panohead without dents.
I am a perfectionist when it comes to stitching images. I dislike (creating or printing) panoramas where you can see obvious seams or moving subjects that show up half (usually referred to as ghosts).Preconditions:
a) All images are shot with same camera settings (whitebalance, aperture, speed). Optional usage of RAW.
b) The more overlap the better (to some extend only!). I recommend somewhere 30..45%. This you set during the Gigapan Setup (FOV setting) or manually while shooting with non-gigapan gear.
c) The more images (or the higher the cameras resolution) you want to stitch the longer it will take, resp. require more memory in order to get results in a realistic timeframe. I am not sure what are the limitations of running Gigapan Stitcher under Windows 32.
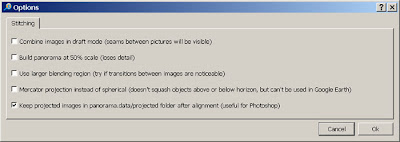
d) Set the "Kepp projected images" option in the Gigapan Stitcher Options screen (see Img.1)
 Img.1
Img.1Retouch/Post Processing:
With plenty of overlap I created the 2 images (detail crop img.2) of the same spot with the scene itself changing. The stitcher cannot take care of moving subjects like people or cars. You can se the result in img. 3 (upper part). To remove the ghost appearance you load the warped images with the overlapping scenes from the data/projected folder (applies only to gigapan stitcher) into Photoshop. If you use PTGui save the resulting panorama file either as image with all layers or save the layers as separate files. Now you copy and paste parts of the scene to repair from the warped images into the stitched "big" file (use 50% transparency to match the non-moving subjects like flagpole, etc.) and use the layer tools to reveal or hide the parts to repair. I find this as a very efficient and fast way to repair the ghosts and its way better than cloning and stamping subjects, background patterns or copy-n-paste-mirror-resize bodyparts. See he result in img.3 or goto gigapan.org (link) to see the fullsize version.
With plenty of overlap I created the 2 images (detail crop img.2) of the same spot with the scene itself changing. The stitcher cannot take care of moving subjects like people or cars. You can se the result in img. 3 (upper part). To remove the ghost appearance you load the warped images with the overlapping scenes from the data/projected folder (applies only to gigapan stitcher) into Photoshop. If you use PTGui save the resulting panorama file either as image with all layers or save the layers as separate files. Now you copy and paste parts of the scene to repair from the warped images into the stitched "big" file (use 50% transparency to match the non-moving subjects like flagpole, etc.) and use the layer tools to reveal or hide the parts to repair. I find this as a very efficient and fast way to repair the ghosts and its way better than cloning and stamping subjects, background patterns or copy-n-paste-mirror-resize bodyparts. See he result in img.3 or goto gigapan.org (link) to see the fullsize version.
Tips for Photoshop:
(Big panoramas require lots of memory for a decent working speed.)
- Use Windows 64 with lot of real memory (not always an option due to availability)
- Terminate any other non-essential programs or services.
- Switch off the copy to clipboard function (see PS options/settings).
- Assign 75..80% of memory to PS (see PS options/settings).
- Reduce the PS history to 2 or max 3, worst case to 1 (see PS options/settings).
- Do a regular EDIT/PURGE/ALL to relief memory (seems to work for me).
- Be patient.


Keine Kommentare:
Kommentar veröffentlichen